 |
|
|
|
|
|
|
|
|
|
|
|
|
|
|
|
|
Lessons Learned |
|
|
|
If you haven't already taken the Grand Tour, I suggest you do that first. It will make the following discussion much easier to understand and visualize.
In
building the Upstairs Train, I ran into a number of problems and
challenges due to its size and complexity. I pass on to you the lessons
I learned in the hope that they will save you some time, frustration,
and possible damage to your trains. These lessons fall into the
following categories:
1. Preventing derailment when a switch is flipped the wrong way.
2. Independently running more than one train at a time in different "zones" when their tracks are interconnected.
3. Running a train in "mainline" mode through two or more zones.
4. Running more than one train around a single loop controlled by semaphores.
5. Preventing an engine from reversing directions after it has been stopped.
6. Designing a control panel that helps the operator keep it all straight.
After you read all that, read through the Summary, which ties it all together.
|
|
|
 |
|
|
Preventing derailment when a switch is flipped the wrong way |
|
|
|
|
|
When
a train approaches a switch from the green side and the switch is
flipped to the red side (or vice versa), it will derail when it reaches
the switch. More than once, I have had a valuable engine derail
and crash to the floor. The solution is to put the switch in
"two-train" mode and insert an insulating pin in the outside rail
of the incoming red line, and in the inside rail of the incoming green
line, between the second and third rail section from the switch.
When the switch is flipped to green in "two-train" mode, it provides
power to the inside rail of the incoming green line and cuts off power
to the outside rail of the incoming red line. What you want is to have
power from the other side of the switch "pull" the train through the
switch rather than having power from behind push the train into the
switch; if the switch is flipped the wrong way, there is no power to
"pull" it to disaster. |
|
|
|
|
|
|
 |
|
|
Now,
in a case like this where you have two switches between the power
source and the approaching train, the middle track is a special
case. The top outside track is on the red side of both switches
so a single fiber pin in the outside rail prevents derailment.
Similarly, the bottom outside track is on the green side of the left
switch so a single fiber pin in the inside rail prevents
derailment. But the middle track is on the red side of one switch
and the green side of the other. It, therefore, needs a fiber pin
in BOTH rails to prevent derailment.
Inserting the insulating
pin three track sections from the switch gives even the longest engine
room to stop before it reaches the switch and derails. Depending
on your layout, however, it may not always be possible to allow three
sections. For example, you need to consider where the end of your
longest train will be when it gets stopped. And other things like
semaphores or operating accessories may get in the way.
Fortunately, two sections are sufficient for most engines. In The
Upstairs Train there are several places where it was impossible to
allow three. In retrospect, however, I think there are a couple
of places where I could lengthen it.
Here's where I put the
fiber pins in The Upstairs Train to prevent derailment. Each P
indicates a fiber pin; the side of the track it is on indicates which
rail it insulates. P on both sides means both rails have
pins. The first diagram shows the upper level and the slopes up
and down. The second shows the lower level. I separated the
diagrams to avoid confusion.
|
|
|
 |
|
|
|
 |
|
|
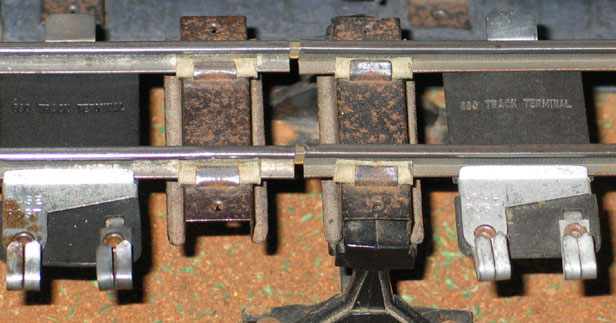
Here's
what the fiber pins look like. Use them in place of the metal
track pins that conduct electricity from one track section to the
next. They insulate the raiils to prevent electrical contact.
|
|
|
 |
|
|
The
pins you buy today are plastic, not fiber. People still call them
fiber pins because the original pins made by Gilbert were made of a
fiber material. If you do find and use the original fiber pins,
be careful when handling them and when you handle the track after
they're inserted. They break very easily. The new plastic
ones bend a lot more before breaking. An inexpensive makeshift
alternative is flat toothpicks shaved down to fit, but they break
easiest.
I suggest you next read about the two modes of operation: Zone Mode and Mainline Mode.
|
|
|
If
you or your friends have some American Flyer trains and would like them
to go to a nice home where they'll be loved and cared for, this is the
place! Email me: theupstairstrain@yahoo.com. See my Wish List for the items I want most.
It
takes time and money to maintain a website like this. If you
would like to contribute financially to its ongoing success, you may
send a contribution via PayPal using theupstairstrain@yahoo.com as the
payee. Both credit card and direct transfers would be gratefully
appreciated.
|
|
|
Now show me: Overview Grand Tour Lessons Learned Modes of Operation
Engines Operating Accessories Bridges Towers Buildings
Crossings Construction Landscaping Lighting Semaphores Control Panel
Wish List History Useful Links The Gilbert Gallery |
|
|
|

|
|
|
|
visitors have viewed this page |
|
